This is Kat's Writing.

Following are a series of words and imagery.
Relax.
Enjoy.
Do not be too alarmed at life nor too complacent in the world. There may be alarming things here. There may not be. Have I mentioned scatological yet?

Nightmare

Nightmare
Showing posts with label free. Show all posts

Friday, September 23, 2011

A Mabon Crocheted White Oak Leaf (Pattern)

A mini-alter for Mabon.
It's Fall! Autumn! The time of the second harvest, when the Earth has born her leafy children of summer and they have set fruit, nut and gourd, and now the last of that harvest is gleaned from the ground. Those who walk upon her have fatted up, living well and easy in the heat. Now is when we begin to nest up for the coming cold, to store up a few supplies, drag out the heavy clothes and get ready to stay warm and well when the snow begins to fly.

While not one of the 'big' pagan holidays, and coming soon after Lughnasadh (the first harvest) it is a nice way to mark the equinox and the true change of seasons.

This is the time of the Dark Mother, the Crone, and when we begin to see the earth dieing into a deep sleep, when the plants go brown and dormant..or dead... and the wild animals find snug dens for the coming hardship. The Harvest Moon has come and gone and now it is truly autumn and the nights grow chill as we contemplate what comes afterward.

But it isn't that cold yet. First comes the turning and falling of the leaves! And so I made some leaves for my alter! (and my hair too!) Please note that these are made to not lie flat. True, real fallen oak leaves are not flat things and neither did I feel that my Mabon decor should be flat things.

And why white oak in particular instead of generic 'leaf'?

My grandparents yard has two huge white oaks. There used to be 4 huge old oaks but the two nearest the house worried them... and so now there are 2. I like these tress. Big, messy with acorns and twigs and leaves.. but I like them. They are friendly trees. They also have oddly shaped, randomly pointed leaves.. so does my pattern!

Big White Oak Leaf.
Needed:

Roughly 60 yards of WW in an earthy/leafy color and a crochet hook that is properly sized. I used Peaches and Cream in 'Good Earth' and a 4.5 mm hook.

Beads, if you want to randomly bead your leaves. (This is done much like beading a knit project with a tiny crochet hook and drawing the bead over the stitch.) Size 2/0 in Ruby mix is what I have used here.

hdc - half double crochet
dc - double crochet
sc- single crochet
dr - decrease
in - increase
st - stitch
sls - slip stitch, generally worked straight into lower row to begin a chain

(All are American crochet terms!)

1. Chain 28+2, work hdc into third loop from hook.

2. 17 dc, leaving a 'stem' chain. Slip st into 18th st. Chain 20.

3. Work hdc into third loop from hook, hdc 2x. DC 29, slip st into 30th loop. Chain 5.

4. hdc into third loop from hook. hdc 2x. dc 10, dr 1, dc 10, dr 1, dc 7, sls and chain 5.

5. Work hdc into third loop from hook, hdc 1, dc 4, dr 1, dc 3, dr 1, dc 7, dr 1, dc 7, sls and chain 4.

6. Work hdc into third loop from hook, hdc 1, sc 5, dr 1, sc 1, hdc 1, dc 6, dr 1, dc 5, sls and chain 4.

7. Work hdc into third loop from hook, hdc 1, sc 7, hdc 1, dc 5, hdc 1, chain 9.

8. Work hdc into third loop from hook, hdc 1, in 1 (use dc), dc 3. Skip next loop and stitch into next loop, pulling yarn tight (creates a 'tuck' in the fabric). Dc 7, hdc 1, ch 12.

9. Work hdc into third loop from hook, hdc 1, dc 3, in 1, dc 4. Skip next loop and stitch into next loop, pulling yarn tight. dc 12, hdc 1, ch 3

10. Work hdc into third loop from hook, dc 12, dr 1, dc 4 hdc 1, sc 1, chain 5.

11. Work hdc into third loop from hook, dc 2, sls into second dc after chain, pulling the yarn tight (creates a little weird angle), hdc 3, dc 9, hdc 6, sc 1, ch 1.

12. Sc into second loop from hook, sc 1, hdc 2, dc 10, hdc 2, sc 2, chain 4.

13. Work sc into 2nd loop from hook, sc 1, hdc 2, sc 2, chain 4

14. Work hdc into third loop from hook, hdc 1, dc 3, hdc 1, dc 9, chain 8.

15. Work hdc into third loop from hook, dc 12, hdc 1 chain 7

16. Work hdc into third loop from hook, hdc 2, dc 12, hdc 2, sc 1, chain 4

17. Work hdc into third loop from hook, dc 3, dr 1, dc 4, dr 1, sc 1, hdc 1, sc 2, ch 5.

18. Work hdc into third loop from hook, hdc 1, dc 11, hdc 1, sc 1, chain 3.

19. Work hdc into third loop from hook, dc 2, dr 1 dc 5, dr 1, hdc 1, ch 1

20. Sc into second loop from hook, hdc 1, dc 5, hdc 1, sc 1, chain 1

21. sls 2, hdc 1, dc 1, hdc 1, sc1 ch 1.

22. sls 1, hdc 1, dc 1.

Finishing!

SC around edges till you reach the 'stem'. HDC down stem front, sc up back of stem. SC back to top of leaf.
My three beasties surround my Mabon alter.

A loop may be placed somewhere to hang this leaf. I just laid it somewhere harvest-y (my table alter) as a cloth.

I'm working on a headband version for Samhain. I'll be sure to add that as well when it is done.

Wednesday, September 21, 2011

Avoiding the Gorram'ed Pre-Beading Session for Hookers too!

For a Spiderweb Samhain thing!


There are times when I want the fun bling of beads in crochet without the pain of pre-beading or the wallet umph of buying pre beaded yarn.

Take my little lovely friend up there.The yarn is a cheap Red Heart crochet cotton, #3.. around 2 dollars. The beads I believe were a buck fifty. Stringing all the beads, distributing them along the yarn (because anal me HATES the rat tail of beads!!) was around 3 hours work..making that a pricey ball of beaded yarn.

Granted, I was watching movies (Amistad and Pulp Fiction).. but still it was tedious and ate into actual knit/crochet time. Now, I was able to very easily take my little ball o beaded yarn and work on it elsewhere.. but if I were to be staying home with it, well, gorram it, three hours is half the time it takes to MAKE the actual damned doily-thing!

So I kept thinking that some other smart person has to have come up with a way to bead crochet like knitters do. No pre-beaded waste of time... and if they have, google has hidden them from me. Even so, I'm probably not the first to come up with it. After fiddling with beads and yarns.. this is how I got the best look.

Avoiding the Gorram'ed Pre-Beading for Hookers 

Needed supplies:

- One project that needs the beads.

- Beads that will fit over said yarn. Worsted uses size 2 or ponys, sock/sport/size 10 to 3 thread stuff uses size 6 beads. I'd assume smaller thread would be ok with smaller beads... but the hook would be itty bitty! For more go read my beading for knitters, I think I made a nice table or links or something.

-One itty bitty hook.

Pictured is an US 11/12 or a 1.00mm hook to use to bead. The hook in thread (working hook) is a 1.65 mm (US 7). The thread is Red Heart Classic Crochet in size 10. Excuse the pictures I was having nasty lighting issues.

 What ya need to do.
First decide where you want to set the bead. On half double and single crochet the bead tends to look best when sat as close to the lower row as possible. In double and longer (triple and so on) the bead looks best when you put it more towards the center of the stitch.
This is a half done double crochet stitch. I am placing the bead in the center of the stitch, or as close to it as I can anyways.

A double stitch ready for center beading.

To add a bead to the second level of a double crochet: First, work half the stitch as normal. Look at the above picture.Like that. Now move to the next picture.
Stick bead on tiny hook and prepare to slide it onto the yarn.

Really easy right? It stays easy! Slide that bead onto that thread/yarn so it looks like this:

Urpin' easy!
Good, good.. Next step is to..

Stick that yarn/thread back on the working hook.
This is the only tiny tricky bit. You place the yarn back on the working hook. Then you draw that yarn tight so you can use that loop to finish the stitch. The tricky bit is deciding which side you want the bead to stick out the most on.
The next step looks like this:
Easy and done!
As you have already decided where that bead will sit you simply flip it more to that side when you work the next stitch to 'fix' it in proper.
Done!

A variation, or beading right on the lowest loop.

If you like the beads lower down, then your setup would look more like this in step one/two/three:

See the three loops on the hook? The bead is always added to the loop you pull through.
And then your next step would be more like this:
A double crochet, half worked, with bead placed by lower row.
Then you'd just finish up the stitch and work the next 'fixing' the bead in the right place.

__________________________________________________________________

Now, when you are looking at all those lovely beaded projects out there and you see the designer gently trying to chide you into believing the pre-beading is not that bad... or any of the other nasty and un-fun bits that go with pre-beading ...like cutting your yarn to add more beads, thus knotting up your work. UGH!

You can now smirk with arcane and gleeful knowledge and use that extra three hours of your life on something meaningful, useful or more fun. Like picking lint off old sweaters or watching cacti grow because you just don't have to do that crap anymore!

Monday, April 4, 2011

The Ipod Excuse

Background..
I'm a plump sort and I'm pretty ok with that. But, I don't like to be unhealthy... even so. And after watching my mother unable to move from her weakness due to her illness and compounded with being very out of shape..and heavy.. I do want to get back into shape. I do, I really do. It was cancer that killed her. I do believe that her lack of physical strength sapped her will. And, I do believe this helped speed the end for her. I hated having to see someone I really loved go through that utter weakness and do not want my loved ones seeing that happen to me if I can help it. 


Thanks to freecycle I've got a comfy reclining bike that works really well.. even if I cannot adjust the tension on the roller after my three (now four! Old Kid!) nephew made it go *pinkpink* the first time he over-wound it... and a few light weights and stretch bands. And I have been using them pretty regular since I got them too.

For some time I've put off the serious walking/jogging for three reasons beyond my lack of a good sports-bra and shoes.

One. It's still cold out.
Two. I don't have a case that will keep the rat-cage Ipod from wacking around and yanking the earbuds out of my ears.. because I went with earbuds instead of headphones for once. (Still not sure I like them. But.. they are purple..!.)
Three. All my good upbeat techno type music is on a machine I can't start up since it needs a part.

I walk my dog almost every day, just around the block or three as long as it isn't too cold. That's about 20 or so minutes. And I like to hop on the bike for a half hour at least three times a week. But, it is hard. It gets dull. I very often listen to audio books when walking and I've tried to do the same with faster workouts.

But it doesn't work. I loose momentum unless I pay a bit of attention there. I start cycling at the rhythm of the spoken word and that is far slower then I'd like. But then I found this (with the help of rav peoples and google). PodRunner.  And it is free! (I did have to tweak my highly restrictive web security settings but Avast didn't make a meep about it afterward.)

If you have iTunes, there is even a free version of  'couch to 5k' from these guys you can get. I haven't tried it yet...but I'm hopeful! Check reason number Three!

So, my number One... it will be in the 50s/60s this week!
My number Two. I fixed that.
This is the back of the piece.
Here is how:

About 40 yards of one color WW yarn and about 20 of a second.
Set of 5 sized 5 US DPNs (or whatever you like for working in the round).
Crochet hook about 4.5 mm in size (smaller then a sz 5 needle)
2 pretty beads. (optional)

This is a great pattern to learn two handed stranding. Check out this KnitPicks video to see what I mean.

Note: I have the older model of Nano. It's the longer and thin type instead of those little squares. So, this should fit 5th, 4th, 2nd and 1st gen models. I checked with my 1st and 4th and it fits just fine.

I have this simple little chart to illustrate the decorative stuffs. It's a quick and dirty little pattern for a REALLY easy little sack.


So, cast on 24 stitches with your main color. Join without twisting..
Work two rows.
Work Part 1 of the chart. You may have to skip the last YO/k2tog pair to give your sack the proper number of holes to run the cord through. Just don't sweat it if this happens. It looks fine when done.
Work 5 rows in Main Color. Work Part 2 of the chart.. the first colorwork here!
Work 7 more rows and then work Part 3 of the chart. Repeat it two more times total for a total of three chart repeats.
Work 5 more rows.
You can then kitchener stitch it closed. But I HATE kitchener so I do this instead. Turn the piece inside out and arrange the stitches on two needle equally in such a way you have a front and back. Use a crochet hook to crochet bind-off through both loops at once as if they were a single loop. Turn work right side out and the bottom looks kitchenered.

Use a 4 stitch icord to make the cord. Just stick it though the fabric in the back and fasten it securely. Don't break the yarn to do so! A crochet chain with beads on the end make a nice pull cord.

Now go do something. I'm gonna.*
(Please excuse dopey picture of me. I'm not a fashionista!)
*No running.. not yet.. I need a real sportbra for the girls and the right sneaks.. but lots more walking till then!

Monday, March 21, 2011

Fat Bottom Girls Need Warm Legs Too!!

I have a confession. I don't have thin little willowy legs. I've got German carthorse legs, thick legs, legs to keep going over snowy veldts, legs made for using and really not seeing. And, they are really white. I don't tan you see. But, they are my legs and I loves them.


That doesn't mean I don't wear skirts or dresses and like wearing them. (And in the summer I even do shorts and short skirts! The scandal, comfort over concealment!) But, in the wintertime... my legs get cold. I often wear leggings of some sort or sometimes even the non-stylishly cozy warmth of thermal undies.

But sometimes, a girl wants something a bit jazy, a bit colorful and even a bit cute. AND I had this lovely Noro laying around...and some chunky homespun 'art yarn'. So here goes!

2 skeins Noro Kureyon
Around 80 yards of a chunky thick/thin or heavy homespun yarn.
set of 5 size US 7 DPNs
set of 5 size US 10 DPNs
Tape measure

You may like to divide your homespun into two equal balls before hand.

I knit on size 7 needles for the Noro and size 10 for the chunky yarn. The Noro was at a gauge of  5 stitches to the inch and 7 rows to the inch.

First, you measure yourself. My ankles are around 10 inches. I used 54 stitches to even out the ribbing. Arrange the stitches around four needles so half the stitches are on two needles and half on the other two.
I did 2x2 ribbing for one inch.

Then plain out knit each row till your piece reaches where your calf muscle begins to swell. Increase once after knitting the first two needles then increase once more at the beginning of the next two. (Essentially you increase on either side of the legwarmer.) Knit a row and repeat the increase row again. So, I had 58 stitches. I knit till almost the end of my first skein.

TURN YOUR WORK INSIDE OUT!!!

Join your chunky yarn and begin knitting with the big needles. Knit three rows and decrease twice in the same manner as the increases, on either side of the warmer. Knit a row and repeat the decreases. Knit a last row. Work an eyelet row of (YO, SSK). Knit till you have enough yarn to bind off with plus one yard.. I did two more rows and then bound off using the lace BO of *knit 1, YO, knit a second stitch*. Slip first two stitches over last stitch. Repeat. On the last stitch slip an empty needle into the first bound off stitch and hook the last stitch over that. Turn work right side out. Weave in ends. Take leftover yard of yarn and run through the eyelets and back through front. You can also use elastic as an way to help keep them up.

Repeat for other leg.


I think they are pretty awesome myself. And warm! :)

Wednesday, January 12, 2011

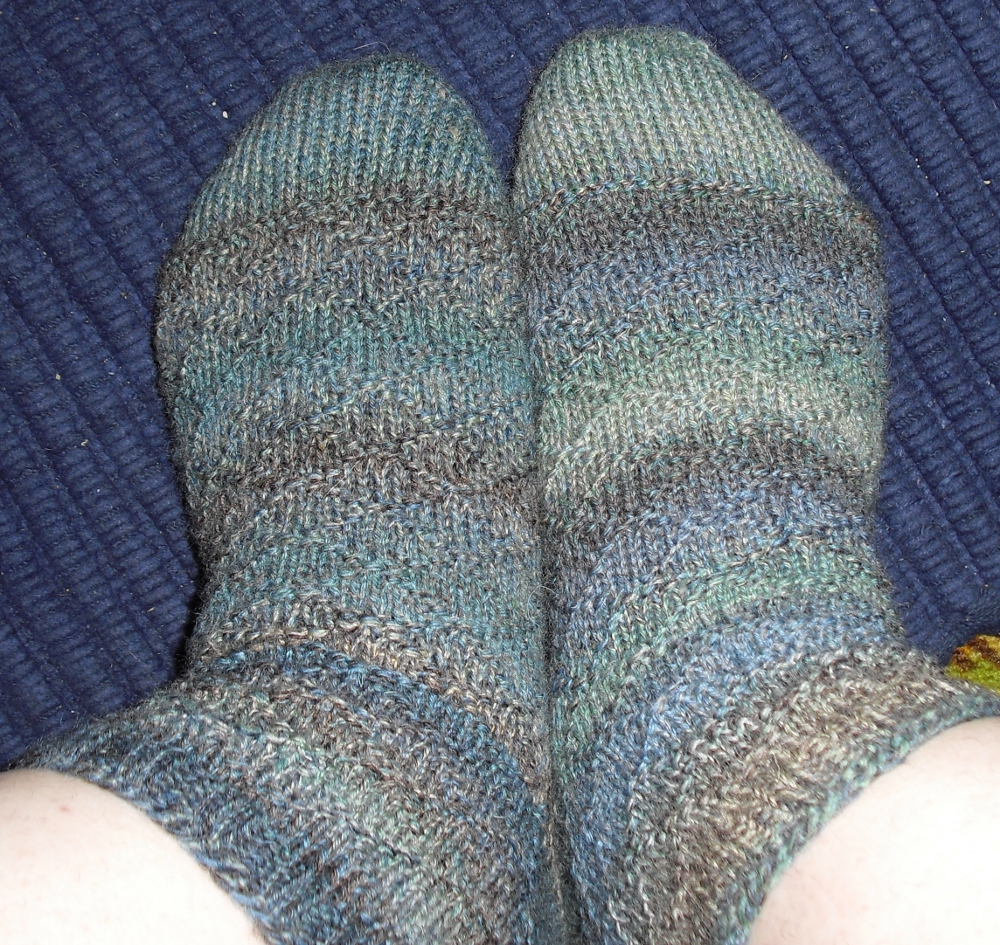
Diamond in the Rough.

This patten assumes some basic toe up sock construction knowledge. It came to be as I was in a place where working any sort of complex pattern would be impossible... but I would have been bored to bits working a plain sock. I was also using Patons Kroy FX. It is a yarn which has continuous color shifts using changing colors spun together instead of a single spun strand that is simply dyed. I wanted to showcase this feature of the yarn. It was why I had chosen the yarn in the first place! I love this look.


I had bought two skeins of several colors  of this stuff on sale... so I used a single skein per sock. This was enough for a sock, but if you like knee highs or have really big feet to cover you may want a third skein. Also this pattern assumes you know things like Turkish cast on and how to do a short row heel. Don't sweat if you don't...that's what google is for. :) Lastly, if you like this pattern, please consider making a donation to either breast cancer research or an animal shelter. If you are broke, you can always just give a click. If there are any mistakes in this pattern, my apologies. Just let me know via comments. Some sizing is possible. 6 diamonds from the center fits my US woman size 9 foot very well. Another repeat to 7 diamonds fits my US 11 man. Adjust as you need.


THE SOCK

2 skeins of Paton's Kroy FX
One set of 5 US size 2 needles (or circ equivalent)
You need to be able to knit/purl, knit front/back, and turn a short row heel as well as an YO Bind-off

Using a Turkish cast on,  CO 8 sts over 4 needles. Knit one row and place a marker.
Increase to 64 in the following manner:

1. From marker, knit one. Knit front/back, knit to one stitch before end of second needle, knit front/back. Knit last stitch. Knit one stitch on third needle. Knit front/back. Knit to second to last stitch on fourth needle. Knit front/back. Knit last stitch.
2. Knit all to marker.
Once you have increased to 64 sts total you begin the sock pattern.

Purl across the instep, knit across the sole. Begin diamond pattern on instep.

1. p1, k7. Repeat across instep. (To even out the pattern slip first stitch of third needle onto second needle to be purled.)
2. k1, p1, k5, p1 Repeat

3. k2, p1, k3, p1, k1 Repeat
4. k3, p1, k1, p1, k2 Repeat
5. k4, p1, k3 Repeat

(All rows on sole are plain knit.)

Continue till long enough,being sure to end on row 1 of pattern.

Do short row heel. It will be divided as 11 sts wrapped, 10 center sts and 11 sts wrapped. Begin pattern (if desired) on back of leg on final knitted row.
Work at least 4 repeats of diamond pattern on leg. When finished, knit two rows before beginning k2, p2 ribbing. Work ribbing for 6 rows (or more if yarn and desire to rib are sufficient) before binding off in the YO stretchy bindoff. Enjoy your subtle but super socks.

Saturday, May 1, 2010

The Birthday Socks

I just turned 30. I'm still not sure how I feel about this event. What I do know is that it was a beautiful wonderful lovely warm day (and the nieghbourhood kids were in hiding! Yes!) and I couldn't enjoy it due to my back deciding it needed to pinch the sciatic nerve and leave me turtled all day.

Still hurts. Damn you, nerves. Perhaps more frozen spinach will help the pain (as far as I'm concerned frozen spinach is only good for a cold compress).

I did manage to finish my birthday socks. See, the first one is a Nixen-Socken.
Loved how it twisted as originally worked; when mirrored by its mate it looks even cooler. As it seemed a shame to hoard the mirror-pattern... I share it! (Please see link for other pattern)

This is a really easy pattern. Any questions, ask or google. Your choice!

Left of Nixen

sts - stitches
st - stitch
k - knit
k-f/b - knit front and back loops
w/t - Wrap and Turn
SSK -slip 2 sts as if to knit, knit together
YO - yarn over

I used a skein of Plymouth Socketta yarn in Plum colorway. It reminds me of a spring flower or a warm evening's sunset..so it's perfect for this time of year. It's also a nice cotton/wool blend which seems like it would make a nice breath-y summer sock.
I used a set of 5 US2 DPNs. I'm a US size 9.5, give or take.
To re-size remember this stitch pattern is worked over 6 stitches!

I did these toe-up (I'm rather hooked). I cast on 16 stitch total, 8 on each of two needles, Turkish style. I love this cast on but you can use whatever on you prefer.
Knit the first row, knitting 4 stitches onto 4 different needles (so it will be 4, 4 4, 4). Pull the tail though the stitches as a row end marker (or add a row end marker)
Next row after slipping marker knit one, knit front and back, knit rest of needle.
Second needle: knit 2. Knit-front-back loops, knit one.
Third needle: knit one, knit front-back loops, knit two.
Fourth needle: knit two, knit front-back loops, knit one. You will be at start of new row and will have increased 4 stitches.

Continue in this fashion:

ROW 1 K1, K-f/b, knit to last 2 sts (on next needle). K-f/b, K2, K-f/b, knit to last two stitches. K-f/b, K1 (At stitch marker)

ROW 2 Knit all

Repeat these two rows until you have 66 sts (or resized number divisible by 6!). When 66 sts are reached, work the foot of the sock in stockinette until the sock is two inches shorter then the foot. You are now ready to start a short row heel.
(Seriously, these are easier then heel flaps!)

Place the bottom 30 sts on a single needle for the sole. There will be 36 instep stitches. Double check that you are not twisting the body of the sock so that the toe is all weird. (Yes.. I have done this.)

Row 1 Knit to the last stitch of the heel needle. Wrap and Turn that last stitch.
Row 2 Purl across the heel needle until you reach the last stitch. Wrap and Turn Purlwise that stitch.

Repeat these two rows until you've ten stitches on each side wrapped (total of twenty wrapped stitches) and ten unwrapped stitches in the middle.

Now, pick up the first wrapped stitch, and knit (as one) the wrap and the stitch.
Turn work, slip one st, purl across to first wrap on the other side and repeat the pick up purlwise. (slight difference)
Turn, Slip one and knit to first un-worked wrap. Pick up.
Repeat this procedure until all wrapped stitches are worked and heel is complete.

Congrats. Mostly done!

Knit 6 rows (or more if you want the lace further from the heel)

Begin pattern at beginning of 7th row.

ROW 1 *2k, SSK, 2k, YO* Repeat this stitch pattern. Be careful not to loose any stitches as the YO's are at the end of the repeat!
ROW2 KNIT ALL (Original calls for a purled row between lace.. if you want to match existing socks which are purled between pattern rows.)

Repeat this till desired sock size. My little summer socks have 12 repeats of these two rows. (24 rows total)

To end, I worked three rows of 3x3 ribbing. I knit the first three sts (the higher part of the lace), and purled the last three (lower part of the lace).

Bind off as follows for a lacy very stretchy edge: Knit one. Yarn Over. Knit one. Slip needle under YO and leftmost stitch and slide both over the right most stitch. Repeat. Use a little crochet hook if it proves difficult to slide the YO and lift knit st over the right st. Use that same hook to slide the yarn tail though the very first bound off stitch to avoid a gap in the edge.

Tuck in yarn ends and enjoy!
For the record, my pattern makes ones that look like the sock with the yellow at the top. It mirrors the Nixen pattern. Please do not profit from this pattern. If anyone asks for this, send them back here to get it themselves. :)